Inhoudsopgave
- 1. De Gereedschapskist
- 2. Gereedschap Selectie
- 3. Tekengereedschappen
-
- 3.1. Algemene eigenschappen
- 3.2. Penseelgedrag
- 3.3. Penseelgereedschappen (Potlood, Penseel, Verfspuit)
- 3.4. Emmer
- 3.5. Kleurverloop
- 3.6. Potlood
- 3.7. Penseel
- 3.8. Gum
- 3.9. Verfspuit
- 3.10. Inktpot
- 3.11. MyPaint-penseel
- 3.12. Klonen
- 3.13. Repareren
- 3.14. Klonen met perspectief
- 3.15. Vervagen/Verscherpen
- 3.16. Smeren
- 3.17. Doordrukken / tegenhouden
- 4. Gereedschap Transformeren
- 5. Ander gereedschap
GIMP verschaft u een uitgebreide gereedschapskist om snel basistaken uit te kunnen voeren, zoals het maken van selecties of het tekenen van paden. De vele gereedschappen die zijn opgenomen in de gereedschapskist van GIMP worden hier in detail besproken.
(In het geval u nieuwsgierig bent, in de taal van GIMP is een "gereedschap" een manier van bewerken van een afbeelding die toegang vereist tot de weergave daarvan, ofwel om aan te geven wat u wilt doen door de muisaanwijzer binnen de weergave te verplaatsen, of om u interactief de resultaten te laten zien van wijzigingen die u hebt gemaakt. Maar als u aan een gereedschap wilt denken als aan een zaag, en aan een afbeelding als aan een stuk hout, zal dat u waarschijnlijk geen problemen opleveren.)
![[Opmerking]](images/note.png)
|
Opmerking |
|---|---|
|
Bekijk Hoofdvensters: De Gereedschapskist voor een overzicht van de gereedschapskist en zijn componenten. |
GIMP heeft een divers assortiment van gereedschappen, die u een grote variëteit aan taken laat uitvoeren. Aan gereedschappen kan worden gedacht als dat zij vallen in een van de volgende categorieën:
-
gereedschap Selectie, die het gedeelte van de afbeelding, dat zal worden beïnvloedt door opvolgende acties, specificeren of aanpassen;
-
gereedschap Tekenen, die de kleuren in sommige delen van de afbeelding wijzigen;
-
gereedschap Transformeren, die de geometrie van de afbeelding veranderen;
-
gereedschap Kleur, die de kleuren in de afbeelding als geheel wijzigen;
-
Andere gereedschappen, die niet in een van de andere categorieën vallen.
De meeste gereedschappen kunnen worden geactiveerd door te klikken op een pictogram in de Gereedschapskist. Standaard zijn sommige gereedschappen alleen toegankelijk via de menu's. Elk gereedschap kan worden geactiveerd vanuit het menu (of het menu voor sommige gereedschappen voor kleuren). De meeste gereedschappen kunnen ook worden geactiveerd via het toetsenbord met een sneltoets.
In de standaard opstelling, gemaakt als GIMP voor het eerst wordt geïnstalleerd, worden in de Gereedschapskist niet van alle gereedschappen pictogrammen weergegeven: sommige gereedschappen zijn weggelaten. U kunt de set met gereedschappen, die worden weergegeven in de gereedschapskist, aanpassen in de Voorkeuren Gereedschapskist.
Er zijn twee redenen waarom u dit misschien zou willen doen: als eerste, als u een gereedschap slechts zelden gebruikt, zou het gemakkelijker kunnen zijn om de gereedschappen die u wilt gebruiken te vinden, als het afleidende pictogram is verwijderd; ten tweede, als u de gereedschappen gebruikt die niet standaard in de Gereedschapskist staan, zou u het misschien handig vinden om de pictogrammen daarvoor gemakkelijk beschikbaar te hebben. In elk geval, u hebt altijd toegang tot elk gereedschap op elk moment met de menu's of vanuit het hoofdmenu.
Pictogrammen van gereedschappen worden standaard gegroepeerd. Groepen van gereedschappen zijn gemarkeerd met een klein donker driehoekje in de rechterbenedenhoek van het pictogram. Het pictogram van de groep die wordt weergegeven is het laatst gebruikte gereedschap in de groep. Klik met rechts op een pictogram van een groep om de lijst met gereedschappen in die groep weer te geven.
U kunt alle gereedschappen laten weergeven door de optie Gereedschapsgroepen gebruiken in Paragraaf 6.13, “Gereedschapskist” uit te schakelen.
Standaard wijzigt de vorm van de aanwijzer als die binnen een afbeelding staat, naar een vorm die aangeeft welk gereedschap actief is. U kunt dit gedrag wijzigen in het gedeelte Aanwijzers van de instellingen voor Invoerapparaten.
Afbeelding 14.2. Gebied Voorgrond-/Achtergrondkleur in de Gereedschapskist
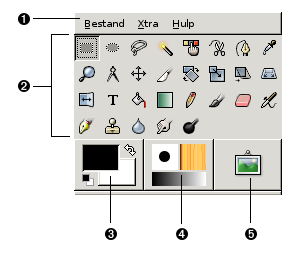
Het gebied Voorgrond-/Achtergrondkleur, gemarkeerd met (3)
- Gebied Kleuren
-
Het gebied Kleuren geeft de huidige kleuren voor de voorgrond en de achtergrond in GIMP weer, die worden gebruikt voor tekenen, vullen en nog veel meer bewerkingen. Klikken op een ervan brengt een dialoogvenster voor het selecteren van een kleur naar voren, dat u in staat stelt te wijzigen naar een andere kleur.
- Standaardkleuren
-
Klikken op het kleine symbool in de linkerbenedenhoek zet de voor- en achtergrondkleuren terug naar zwart en wit. Drukken op de D-toets heeft hetzelfde effect.
- Voor-/Achtergrondkleuren wisselen
-
Klikken op het symbool met twee pijlkoppen wisselt de voor- en achtergrondkleur om. Drukken op de X-toets heeft hetzelfde effect.
![[Tip]](images/tip.png)
Tip U kunt een van deze twee kleuren direct op een laag klikken-en-slepen: het zal de hele laag vullen.
Afbeelding 14.3. Gebied Actieve penseel, patroon en kleurverloop in de Gereedschapskist

Het gebied Actieve penseel, patroon en kleurverloop, gemarkeerd met (4)
Standaard wordt dit gebied niet weergegeven. U kunt dit gebied toevoegen met → → : Paragraaf 6.13, “Gereedschapskist”.
Dit gedeelte van de Gereedschapskist geeft het momenteel geselecteerde penseel, patroon en kleurverloop weer. Klikken op een ervan brengt een dialoogvenster naar voren dat u in staat stelt het te wijzigen.
Afbeelding 14.4. Gebied Actieve afbeelding in de Gereedschapskist

Het gebied Actieve afbeelding, gemarkeerd met (5)
Standaard wordt dit gebied niet weergegeven. U kunt dit gebied toevoegen met → → : Paragraaf 6.13, “Gereedschapskist”.
Een miniatuur van de actieve afbeelding wordt in dit gebied weergegeven. Als u klikt op die miniatuur, wordt het dialoogvenster Afbeeldingen geopend. Dat kan nuttig zijn als u veel afbeeldingen op uw scherm hebt staan.
Als u GIMP gebruikt op een Unix-achtig besturingssysteem met het X Window System, kunt u ook de miniatuur slepen naar een ingeschakelde XDS bestandsbeheerder om de corresponderende afbeelding direct op te slaan.
Afbeelding 14.5. Dialoogvenster Gereedschapsopties
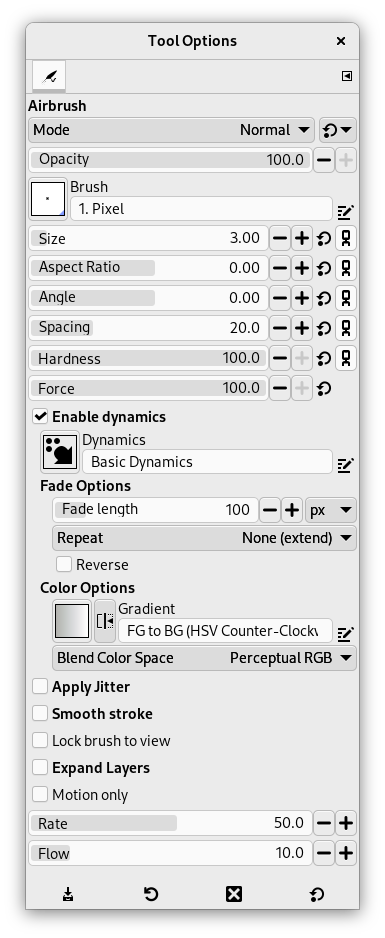
Dialoogvenster Gereedschapsopties voor de Verfspuit.
Als u de dingen hebt ingesteld zoals de meeste mensen dat doen, zal het activeren van een gereedschap ervoor zorgen dat het dialoogvenster Gereedschapsopties verschijnt onder de Gereedschapskist. Als u de dingen niet op deze manier hebt ingesteld, zou u dat waarschijnlijk wel moeten doen: het is heel moeilijk om gereedschappen effectief te gebruiken, zonder in staat te zijn hun opties te bewerken.
![[Tip]](images/tip.png)
|
Tip |
|---|---|
|
The Tool Options appear beneath the Toolbox in the default setup. If you lose it somehow, you can get it back by creating a new Tool Options dialog using → → and then docking it below the Toolbox. Alternatively you can double-click any tool button in the Toolbox as a quick way to open the Tool Options. If it appears in a different dock than the one you want, you can drag it to your preferred dock. See the section on Dialogs and Docking if you need help moving the Tool Options. |
Elk gereedschap heeft zijn eigen specifieke set opties. De keuzes die u voor ze maakt worden vastgehouden gedurende de gehele sessie, totdat u ze wijzigt. In feite worden de gereedschapsopties onderhouden van sessie tot sessie. Het blijven bestaan van gereedschapsopties tussen sessies kan soms heel vervelend zijn: een gereedschap gedraagt zich heel vreemd, en u kunt niet bedenken waarom, totdat u zich herinnert dat u een hele ongewone optie hebt gebruikt toen u er de laatste keer mee werkte, ongeveer twee weken geleden.
Onderin het dialoogvenster Gereedschapsopties staan vier knoppen:
-
Gereedschapsopties opslaan…
-
Deze knop stelt u in staat de instellingen voor het huidige gereedschap op te slaan, zodat u ze later terug kunt zetten. Het brengt het Paragraaf 7.2, “Dialoogvenster Voorinstellingen” naar voren dat u in staat stelt een naam te geven aan de nieuwe voorinstelling. Wanneer u Gereedschapsopties terugzet, worden alleen opgeslagen voorinstellingen voor het actieve gereedschap weergegeven, dus u hoeft zich geen zorgen te maken om de naam van het gereedschap op te nemen als u hier een naam toewijst.
-
Gereedschapsopties herstellen…
-
Deze knop stelt u in staat een eerder opgeslagen voorinstelling met opties voor het actieve gereedschap terug te zetten. Als er nog nooit eerder voorinstellingen zijn opgeslagen voor het actieve gereedschap, zal de knop zijn uitgeschakeld. Anders zal het klikken erop een menu naar voren brengen dat de namen weergeeft van alle opgeslagen sets met opties: kiezen van een menu-item zal die instellingen toepassen.
-
Gereedschapsopties verwijderen
-
Deze knop stelt u in staat een eerder opgeslagen set met opties voor het actieve gereedschap te verwijderen. Als er nog nooit eerder geen sets met opties zijn opgeslagen voor het actieve gereedschap, zal de knop eenvoudigweg de naam van het gereedschap herhalen. Anders zal het klikken erop een menu naar voren brengen dat de namen weergeeft van alle opgeslagen sets met opties: de geselecteerde voorinstelling zal worden verwijderd.
-
Terugzetten op standaardwaarden
-
Deze knop zet de opties voor het actieve gereedschap terug naar zijn standaard waarden. Als u de Shift-toets ingedrukt houdt tijden het drukken op de knop Terugzetten, zullen de opties voor alle gereedschappen worden teruggezet naar hun standaard waarden.
In aanvulling op de opdrachten voor de knoppen hierboven, heeft het menu Tab van Gereedschapsopties een extra submenu:
- Gereedschapsvoorinstelling bewerken
-
Dit submenu geeft een lijst weer met voorinstellingen voor het actieve gereedschap die u kunt bewerken. Selecteren van een ervan zal de menu Bewerker gereedschapsvoorinstelling openen met die voorinstelling geladen. Van daaruit kunt u de voorinstelling bewerken, tenzij het een van de standaard voorinstellingen is die zijn meegeleverd met GIMP.
Hieronder zullen we de interactie met schuifbalken en het scrollwiel van de muis uitleggen.
- Nieuwe schuifbalken
-
U kunt meerdere hulptoetsen gebruiken door ofwel met links te klikken of te scrollen met het muiswiel:
Tabel 14.1. Interactie met de widget Schuifbalk
Muis / toetsencombinatie
Opdracht 
Wijzig de waarde naar wat onder de aanwijzer staat 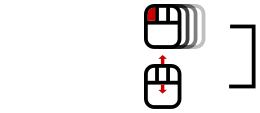
Wijzig de waarde met de standaard verhoging 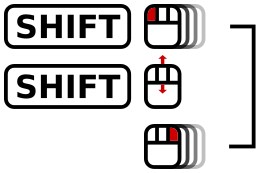
Shift + of
Wijzig de waarde met een kleinere verhoging 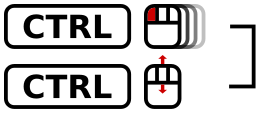
Ctrl +
Wijzig de waarde met een hogere verhoging 
Modus voor numerieke invoer, selecteer de waarde niet 
Modus voor numerieke invoer, selecteer de waarde Hint: Elke interactie links-klik schakelt de modus Numerieke invoer uit.
Wanneer u de waarden bij benadering hebt ingesteld, kunt u ze heel precies fijn afstemmen met de twee kleine pijltjes aan de rechterkant van de schuifbalk.
Het waardengebied van de schuifbalk is ook als tekstbewerker te gebruiken, u kunt de waarde direct intypen.
Voor sommige opties kunt u de aanwijzer tot buiten het dialoogvenster slepen. U kunt zo, bijvoorbeeld met de schuifbalk voor de grootte, de maximumwaarde (10000) krijgen.
- Muiswielacties op het canvas
-
Bij het gebruik van gereedschappen kunt u ook het muiswiel gebruiken, in combinatie met verschillende hulptoetsen, om dingen te doen met de gereedschapsopties van het geselecteerde gereedschap:
-
Alt + muiswiel: verhogen/verlagen doorzichtigheid
-
Shift+Primair + muiswiel: verhogen/verlagen helling
-
Shift+Alt + muiswiel: verhogen/verlagen hoek
-
Primair+Alt + muiswiel: verhogen/verlagen grootte
-
Shift+Primair+Alt + muiswiel: verhogen/verlagen onderlinge afstand
Opmerking: de hulptoets Primair is gewoonlijk de toets Ctrl of Cmd, afhankelijk van uw platform.
-


