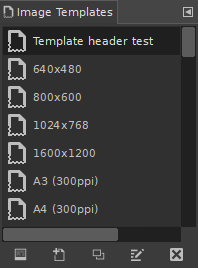
Les plantilles són paràmetres d'imatges predefinides que podeu utilitzar per crear ràpidament una nova imatge amb les dimensions, la resolució, etc. preferides. El GIMP inclou moltes plantilles instal·lades, però també podeu crear-ne de vostres. Quan creeu una imatge nova, podeu accedir a la llista de plantilles existents per triar-ne una i utilitzar-la com a base per a la vostra nova imatge. El diàleg «Plantilles» us permet gestionar-les.
Aquest diàleg és un diàleg acoblable; mireu la secció Secció 2.3, «Diàlegs i acobladors» sobre el seu ús.
Podeu accedir-hi:
-
des del menú principal: → → .
-
des del menú Pestanya en qualsevol diàleg acoblable fent clic al botó del menú Pestanya
 i seleccionant → .
Se selecciona una plantilla simplement fent clic en la seva icona. Fer clic dret fa aparèixer un menú local amb les mateixes funcions que els botons.
En el menú de la pestanya del diàleg de les «Plantilles», podeu triar entre i . En mode graella, les plantilles es mostren en una taula d'icones idèntiques (tret que s'hagi assignat una icona en particular, com es veurà més endavant). Només es mostra el nom de la plantilla seleccionada. En mode llista, les plantilles s'alineen verticalment; les icones són idèntiques i es mostren tots els noms.
En aquest menú de la pestanya, l'opció Previsualitza la mida permet canviar la mida de les icones.
![[Suggeriment]](images/tip.png)
|
Suggeriment |
|---|---|
|
Ctrl+F obre un camp de cerca. Consulteu Visualitza com a llista |
La barra de botons de la part inferior ofereix la funcionalitat següent:
-
 Crea una imatge nova a partir de la plantilla seleccionada
-
Fent clic en aquest botó es crea una nova imatge amb la configuració definida en la plantilla seleccionada.
-
 Crea una plantilla nova
-
Fent clic en aquest botó, s'obre el diàleg Plantilla nova, idèntic al diàleg Edita la plantilla, que veurem més a baix.
-
 Duplica la plantilla seleccionada
-
En fer clic en aquest botó, s'obre el diàleg Edita la plantilla que s'explica a continuació.
-
 Edita la plantilla seleccionada
-
En fer clic en aquest botó, s'obre el diàleg Edita la plantilla on podreu ajustar la configuració relacionada amb la imatge per a la plantilla seleccionada.
-
 Elimina la plantilla seleccionada
-
Això suprimirà la plantilla seleccionada després de demanar confirmació.
Suggeriment Every template is stored in a
templatercfile in your personal GIMP directory. If you want to restore some deleted templates, you can copy or append template entries to your file from the mastertemplatercfile in theetc/gimp/3.0directory of GIMP's system folder.
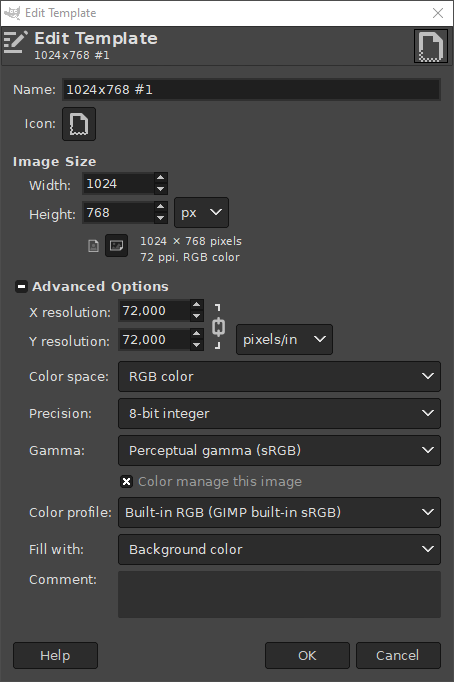
El diàleg us permet configurar les especificacions de la plantilla seleccionada.
Podeu accedir en aquest diàleg fent clic al botó que trobareu a sota del Diàleg Plantilles
Opcions
- Nom
-
En aquest quadre de text, podreu modificar el nom de la plantilla.
- Icona
-
En fer clic en aquesta icona, podreu seleccionar una icona diferent que es mostrarà davant del nom d'aquesta plantilla. La icona es pot triar des d'una llista d'icones predefinides, des d'un fitxer de l'ordinador o enganxant-la des del porta-retalls.
- Mida de la imatge
-
Ací podreu definir l'Amplada i l'Alçada de la nova imatge. Les unitats predeterminades són els píxels, però podeu triar una unitat diferent si ho preferiu, mitjançant el menú adjunt. Si ho feu, tingueu en compte que la mida del píxel resultant ve determinada per la resolució X i Y (que podeu canviar a les Opcions avançades) i establint «Punt per punt» al menú .
- Botons Retrat/Paisatge
-
Aquests botons commuten entre els modes Retrat i Paisatge. L'efecte és intercanviar els valors d'Amplada i Alçada. Si les resolucions X i Y són diferents (en opcions avançades), aleshores aquests valors també es poden intercanviar. A la dreta hi ha la mida de la imatge, la resolució i l'espai de color.
Opcions avançades
Les opcions avançades permeten canviar diversos paràmetres d'imatges addicionals.
- Resolució X i Y
-
Els valors dels camps Resolució X i Resolució Y es relacionen principalment amb la impressió: no afecten la mida de la imatge en píxels, però poden determinar-ne la mida física quan està imprès. Els valors de resolució X i Y poden determinar com es tradueixen els píxels a altres unitats de mesura, com ara mil·límetres o polzades.
Suggeriment Si voleu mostrar la imatge a la pantalla a les dimensions correctes, seleccioneu → Estableix el factor zoom al 100% per veure la imatge a mida real de pantalla. El calibratge de la mida de la pantalla normalment es fa quan s'instal·la el GIMP, però si la imatge no es mostra a la mida correcta, potser haureu d'ajustar els paràmetres de la pantalla en el GIMP. Podeu fer-ho al diàleg Preferències.
- Espai de color
-
Podeu crear la imatge nova en diferents modes de color, ja sigui una imatge RGB o una imatge en escala de grisos.
- Color RGB
-
La imatge es crea amb el sistema de color Vermell, Verd, Blau, que és el que fa servir el monitor o la pantalla del televisor.
- Escala de grisos
-
La imatge es crea en blanc i negre, amb diverses tonalitats de gris. A part dels vostres interessos artístics, aquest tipus d'imatge pot ser necessària per a alguns connectors. No obstant això, el GIMP us permet canviar una imatge RGB a escala de grisos, si ho voleu.
No podeu crear una imatge indexada directament amb aquest menú, però per descomptat sempre podreu convertir la imatge en mode indexat després d'haver-la creat. Per fer-ho, utilitzeu l'ordre → → .
- Precisió
-
Aquesta configuració us permet definir la codificació que s'utilitza per emmagatzemar la informació dels píxels. Per a més detalls, consulteu la secció Codificació d'imatges.
Hi ha cinc opcions disponibles:
-
Enter de 8 bits
-
Enter de 16 bits
-
Enter de 32 bits
-
Coma flotant de 16 bits
-
Coma flotant de 32 bits
Si us pregunteu quina és la diferència entre un enter i un coma flotant (a l'àrea gràfica): si teniu una imatge amb una precisió d'enter de 16 bits per canal, llavors teniu 65.536 tonalitats de diferents tons de color vermell, verd i blau, tots ells esglaonats per igual entre si (igual distància de color). Si el teniu en coma flotant, llavors no hi ha passos d'igual amplada, de manera que podeu distribuir els possibles valors de color en els intervals seleccionats. Per exemple: si sabeu que teniu una imatge molt fosca amb molts tons de color vermell fosc, us beneficiareu de la coma flotant perquè podreu disminuir la importància de les tonalitats més brillants i obtenir molts detalls de color només dels vermells més foscos.
Figura 15.54. Exemple de precisió
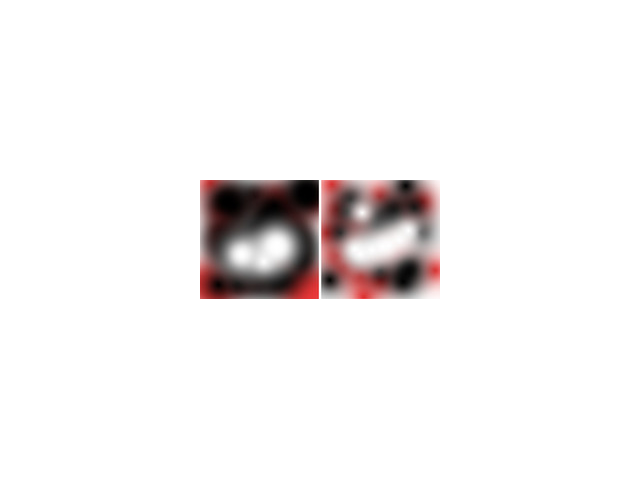
La imatge esquerra és de 8 bits, la dreta és de 32 bits. Podeu veure que hi ha molts més colors disponibles entre les transicions de color a la imatge dreta.
-
- Gamma
-
Ací podeu triar el canal codificació del canal per a la imatge. Les opcions són No lineal i Llum lineal. Per a una precisió d'enter de 8 bits, el valor per defecte és no lineal, i per a una precisió de coma flotant de 32 bits és llum lineal. Per a més informació, consulteu quines opcions de precisió hauríeu de triar.
- Perfil de color
-
Ací podeu triar un perfil de color que s'utilitzarà per a la imatge. El valor per defecte és el perfil de color estàndard del GIMP basat en Espai de color, Precisió, i Gamma. Si preferiu fer servir un perfil de color diferent, podeu seleccionar un fitxer de perfil de color ICC des d'una ubicació de l'ordinador triant Seleccioneu el perfil de color del disc....
- Perfil de color de provatura suau
-
Podeu adjuntar un perfil de color CMYK a la imatge amb aquesta opció. Aquest perfil s'utilitzarà per crear una visualització de prova suau de la imatge quan l'opció Colors a prova estigui activada al menú Visualitza. Igual que amb el perfil de color, si preferiu usar-ne un de diferent, podeu seleccionar un fitxer de perfil de color ICC des d'una ubicació de l'ordinador triant Seleccioneu el perfil de color del disc....
- Propòsit de renderització de provatura suau en pantalla
-
Aquesta opció us permet seleccionar la intenció de renderització que s'utilitzarà per convertir els colors de la imatge a prova suau al vostre dispositiu de visualització quan → → està habilitat. Els quatre intents són «Perceptiu», «Colorimètric relatiu», «Saturació» i «Colorimètric absolut». Vegeu Secció 6.4, «Gestió del color» i Secció 6.8, ««Color Management» Submenu» per a més informació.
- Usa la compensació del punt negre
-
Quan està habilitat, l'algorisme BPC intenta ajustar la visualització d'àrees més fosques a la imatge quan l'opció Colors de prova està activada al menú Visualitza.
- Omple amb
-
Ací, especifiqueu el color de fons que s'utilitzarà per a la nova imatge. Sens dubte, també és possible canviar el fons d'una imatge més endavant. Podeu trobar més informació sobre com fer-ho al Diàleg de capes.
Hi ha diverses opcions:
-
Ompliu la imatge amb el color de primer pla actual que es mostra a la caixa d'eines.
Tingueu en compte que podeu canviar el color del primer pla mentre la finestra de diàleg «Imatge nova» està oberta.
-
Ompliu la imatge amb el color de fons actual que es mostra a la caixa d'eines. (També podeu canviar el color de fons, mentre la finestra del diàleg està oberta.)
-
Ompliu la imatge amb Gris mitjà (CIELAB). Això crearà una capa amb un color gris que és el 50% de la lluminositat perceptiva en el mode color).
-
Omple la imatge amb Blanc.
-
Fill the image with Transparency. If you choose this option, the image is created with an alpha channel and the background is transparent. The transparent parts of the image are then displayed with a checkered pattern, to indicate the transparency.
-
Ompliu la imatge amb un patró. Si trieu aquesta opció, la imatge s'omplirà amb el patró actiu (el qual podreu canviar mentre aquest diàleg estigui obert).
-
- Comentari
-
Podeu escriure un comentari descriptiu ací. El text s'adjuntarà a la imatge com un paràsit, i es desarà amb la imatge amb alguns formats de fitxer (PNG, JPEG, GIF).
![[Nota]](images/note.png)
Nota Podeu veure i editar aquest comentari al diàleg Propietats de la imatge.


