Indice
- 1. La barra degli strumenti
- 2. Strumenti di selezione
- 3. Strumenti di disegno
-
- 3.1. Funzioni comuni
- 3.2. Dinamiche
- 3.3. Strumenti di disegno (matita, pennello, aerografo)
- 3.4. Riempimento colore
- 3.5. Gradiente
- 3.6. Matita
- 3.7. Pennello
- 3.8. Gomma
- 3.9. Aerografo
- 3.10. Stilo
- 3.11. Pennello MyPaint
- 3.12. Strumento clona
- 3.13. Cerotto
- 3.14. Clona in prospettiva
- 3.15. Sfoca/Contrasta
- 3.16. Strumento sfumino
- 3.17. Scherma/Brucia
- 4. Strumenti di trasformazione
- 5. Other Tools
GIMP fornisce una barra degli strumenti completa al fine di eseguire rapidamente compiti basilari come effettuare delle selezioni o disegnare dei tracciati. Qui vengono trattati nel dettaglio la maggior parte degli strumenti contenuti nella barra degli strumenti di GIMP.
Nel caso foste curiosi, nel gergo di «GIMP», uno "strumento" è un modo di agire su di un'immagine. Attraverso la visualizzazione dell'immagine, lo strumento permette di dirigere l'operazione da effettuare, sia muovendo il puntatore del mouse all'interno della finestra visualizzata che mostrando interattivamente i risultati dei cambiamenti che si ha apportato. Ma se si pensa allo strumento come ad una sega, e all'immagine come ad un pezzo di legno, nessuno si scandalizzerà.
![[Nota]](images/note.png)
|
Nota |
|---|---|
|
Vedere finestre principali: il pannello strumenti per una panoramica del pannello strumenti ed i suoi componenti. |
GIMP has a diverse assortment of tools that let you perform a large variety of tasks. The tools can be thought of as falling into the following categories:
-
Strumenti di selezione, che specificano e modificano una porzione dell'immagine che può essere soggetta ad ulteriori operazioni;
-
Strumenti di disegno, che alterano i colori in alcune parti dell'immagine;
-
Strumenti di trasformazione, che alterano la geometria dell'immagine;
-
Strumenti di colore, che alterano i colori nell'immagine come insieme;
-
Other tools, which don't fall into the other categories.
Most tools can be activated by clicking on an icon in the Toolbox. By default, some tools are accessible only via the menus. Every tool can be activated from the menu (or the menu for some color tools). Most tools can also be activated from the keyboard using an accelerator key.
In the default setup, created when GIMP is first installed, not all tools show icons in the Toolbox: some tools are omitted. You can customize the set of tools that are shown in the Toolbox in the Toolbox Preferences.
There are two reasons you might want to do this: first, if you only rarely use a tool, it might be easier to find the tools you want if the distracting icon is removed; second, if you use tools that are not found in the toolbox by default, you might find it convenient to have icons for them easily available. In any case, you can always access any tool at any time using the or menu from the main menu.
Tool icons are grouped by default. Tool groups are marked with a small dark triangle at the bottom right corner of the icon. The group icon displayed is the last used tool in the group. Right click on the group icon to display the list of tools in the group.
You can get all tools displayed by unchecking the Use tool groups option in Sezione 6.13, «Strumenti».
By default, the shape of the pointer changes when it is inside an image, to a shape that indicates which tool is active. You can change this behavior in the Pointers section of the Input Devices settings.
Figura 14.2. Foreground/Background Colors Area in the Toolbox
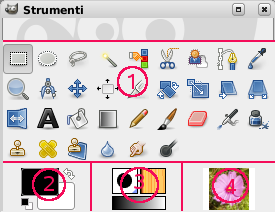
The Foreground/Background Colors area, marked with (3)
- Area dei colori
-
The color area shows GIMP's current foreground and background colors, which are used for painting, filling, and many other operations. Clicking on either one of them brings up a color selector dialog that allows you to change to a different color.
- Colori predefiniti
-
Clicking on the small symbol in the lower left corner resets the foreground and background colors to black and white. Pressing the D key has the same effect.
- Swap Foreground/Background colors
-
Clicking on the double-headed arrow symbol swaps the foreground and background colors. Pressing the X key has the same effect.
![[Suggerimento]](images/tip.png)
Suggerimento È possibile fare clic e trascinare uno di questi colori direttamente su un livello: lo riempirà completamente.
Figura 14.3. Active Brush, Pattern and Gradient Area in the Toolbox

The Active Brush, Pattern and Gradient area, marked with (4)
By default, this area is not displayed. You can add this area through → → : Sezione 6.13, «Strumenti».
Questa parte della barra degli strumenti visualizza il pennello, il motivo ed il gradiente attivi. Facendo clic su ognuno di essi appare una finestra che permette di cambiarli.
By default, this area is not displayed. You can add this area through → → : Sezione 6.13, «Strumenti».
A thumbnail of the active image is displayed in this area. If you click on this thumbnail, the Images dialog is opened. This can be useful if you have many images on your screen.
If you use GIMP on a Unix-like operating system with the X Window System, you can also drag and drop the thumbnail to an enabled XDS file manager to directly save the corresponding image.
Figura 14.5. Finestra di dialogo delle opzioni dello strumento
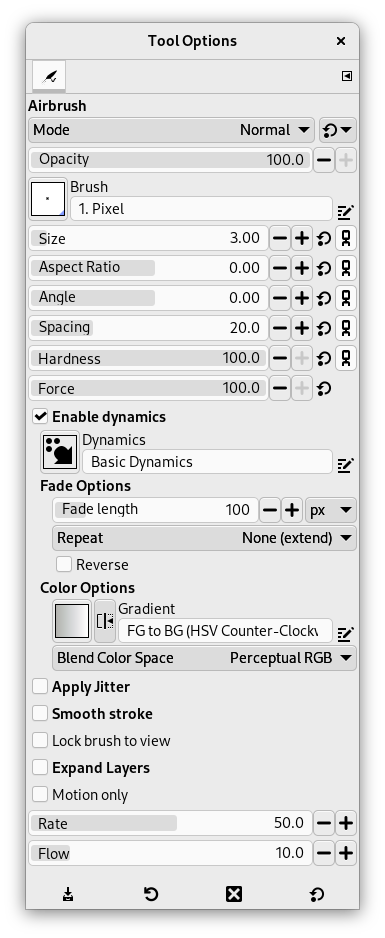
La finestra di dialogo delle opzioni dello strumento aerografo.
Se avete impostato le cose come fa la maggior parte delle persone, l'attivazione di uno strumento provocherà la comparsa della finestra delle opzioni strumento subito sotto alla barra degli strumenti. Se non avete impostato le cose così, probabilmente dovreste farlo: è molto difficile usare efficacemente gli strumenti senza essere in grado di manipolare le loro opzioni.
![[Suggerimento]](images/tip.png)
|
Suggerimento |
|---|---|
|
The Tool Options appear beneath the Toolbox in the default setup. If you lose it somehow, you can get it back by creating a new Tool Options dialog using → → and then docking it below the Toolbox. Alternatively you can double-click any tool button in the Toolbox as a quick way to open the Tool Options. If it appears in a different dock than the one you want, you can drag it to your preferred dock. See the section on Dialogs and Docking if you need help moving the Tool Options. |
Ogni strumento ha un suo specifico insieme di opzioni. Le scelte che vengono effettuate si mantengono tra le sessioni fino a che non vengono cambiate. Infatti le opzioni degli strumenti vengono conservate di sessione in sessione. La persistenza delle opzioni degli strumenti attraverso le sessioni alle volte può essere un'inconveniente fastidioso: ad esempio può capitare che uno strumento si comporti molto stranamente, senza motivi apparenti fino a che non ci si ricorda di averlo usato con una opzione inconsueta, diverso tempo addietro.
In fondo alla finestra di dialogo opzioni dello strumento, appaiono quattro pulsanti:
-
Save Tool Preset…
-
This button allows you to save the settings for the current tool, so that you can restore them later. It brings up the Sezione 7.2, «Finestra di dialogo preimpostazioni strumenti» allowing you to give a name for the new preset. When you Restore options, only saved presets for the active tool are shown, so you need not worry about including the name of the tool when you assign a name here.
-
Restore Tool Preset…
-
This button allows you to restore a previously saved preset of options for the active tool. If no presets have ever been saved for the active tool, the button will be disabled. Otherwise, clicking it will bring up a menu showing the names of all saved option sets: choosing a menu entry will apply those settings.
-
Cancella preimpostazioni strumento
-
Questo pulsante permette di cancellare un insieme di opzioni precedentemente salvate per lo strumento attivo. Se per lo strumento attivo non è stato salvato nessun insieme di opzioni, il pulsante riporterà semplicemente il nome dello strumento. Altrimenti, facendo clic sopra di esso apparirà un menu con i nomi delle preimpostazioni salvate: la voce selezionata, verrà eliminata.
-
Reimposta ai valori predefiniti
-
This button resets the options for the active tool to their default values. If you hold the Shift key while pressing the Reset button, the options for all tools will be reset to their default values.
In addition to the commands for the above buttons, the Tool Options tab menu has an extra submenu:
- Edit Tool Preset
-
This submenu shows a list of presets for the active tool that you can edit. Selecting one of them will open the Tool Presets Editor with that tool preset loaded. From there you can edit the preset, unless it is one of the default presets that come with GIMP.
Below we will explain the interaction with sliders and the mouse scroll-wheel.
- Nuovi cursori
-
You can use multiple modifiers with either left-click or mouse wheel scrolling:
Tabella 14.1. Interaction with the Slider Widget
Mouse / key combination
Action 
Change the value to what's under the pointer 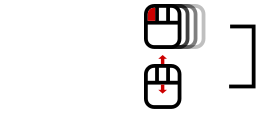
Change the value using the default increment 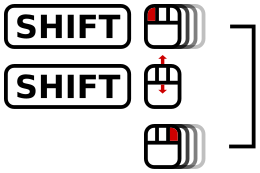
Shift + or
Change the value using smaller increment 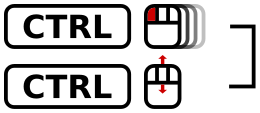
Ctrl +
Change the value using larger increment 
Enter numeric input mode, do not select the value 
Enter numeric input mode, select the value Hint: Any left-click interaction enables numeric input mode.
Una volta impostato il valore in modo approssimativo, lo si può regolare in maniera più precisa usando i due pulsanti a forma di piccola freccia sul lato destro del cursore.
L'area del valore nell'area del cursore funziona come un editor di testi: si può modificare il valore o inserirne un altro direttamente.
Per alcune opzioni, si può trascinare il puntatore fuori della finestra di dialogo dello strumento. Per esempio con il cursore della dimensione, si può ottenere il valore massimo di 10.000, in questo modo.
- Azioni della rotellina del mouse sulla superficie
-
Quando si usano gli strumenti, è possibile usare la rotellina del mouse, in combinazione con vari modificatori, per fare cose utili con le opzioni dello strumento dello strumento selezionato:
-
Alt + Mouse-wheel: incrementa/decrementa l'opacità
-
Shift+Primary + Mouse-wheel: incrementa/decrementa il rapporto dimensioni
-
Shift+Alt + Mouse-wheel: incrementa/decrementa l'angolo
-
Primary+Alt + Mouse-wheel: incrementa/decrementa la dimensione
-
Shift+Primary+Alt + Mouse-wheel: incrementa/decrementa la spaziatura
Note: the Primary modifier is usually Ctrl or Cmd, depending on your platform.
-


