| Kapittel 14. Verktøy | ||
|---|---|---|

|
Del III. Funksjonar i GIMP |  |
| Kapittel 14. Verktøy | ||
|---|---|---|
|
|
Del III. Funksjonar i GIMP | |
Innhald
GIMP har ei omfangsrik verktøykasse som gjer det lett å skifta mellom dei ulike verktøya, anten det no er å gjera utval eller å teikna banar. Alle verktøya brukte i GIMP er forklarte i dette kapitlet.
(Berre sånn i tilfelle du skulle vere nysgjerrig: I GIMP-sjargongen, og i andre program for bilethandtering, er «verktøy» ein måte å handtera eit bilete på som krev tilgang til biletvisinga utover det å flytte peikaren rundt om på biletflata, eller på ein interaktiv måte kan visa resultata av endringane du har gjort med biletet. Dersom du i staden tenker på verktøy som meir av typen sag, og på biletet som eit trestykke, vil du likevel ikkje vere så ute av leia.)
![[Notat]](images/note.png)
|
Notat |
|---|---|
|
Du finn eit oversyn over verktøykassa og komponentane der i Hovudvindauge: Verktøykassa. |
GIMP har eit godt utval av verktøy for å utføre ulike oppgåver. Desse verktøya kan delast inn i desse gruppene:
Utvalsverktøya som vert brukte for å markera kva område av biletet det kan arbeidast på,
Teikneverktøya som vert brukte for å endra fargane i delar av biletet.
Transformeringsverktøya vert brukte for å endra geometrien for biletet.
Fargeverktøya, som vert brukte for å endra fargane i biletet.
Andre verktøy er dei verktøya som ikkje fell inn under dei andre gruppene.
Du kan ta i bruk dei fleste verktøya ved å klikka på eit symbol inne i verktøykassa. I normaloppsettet kan nokre av verktøya berre nåast frå menyane. Alle verktøya kan slåast på frå menyen (eller for nokre fargeverktøy frå menyen ). Dei fleste verktøya kan også slåast på med ulike tastekombinasjonar (snartastar).
I standardoppsettet, oppretta då GIMP vart installert første gongen, viser ikkje alle verktøyikona i verktøykassa: nokre verktøy er utelete. Du kan tilpassa settet med verktøy som vert vist i verktøykassa i Verktøykassepreferansar.
Det er to grunnar til at du kanskje vil gjera dette: For det første, viss du berre sjeldan brukar eit verktøy, kan det vera lettare å finna verktøya du vil ha viss det distraherande ikonet er fjerna. For det andre, viss du brukar verktøy som ikkje finst i verktøykassa som standard, kan det henda du finn det praktisk å ha ikona for dei lett tilgjengelege. I alle fall kan du alltid få tilgang til alle verktøya når som helst ved å bruka menyen eller frå hovudmenyen.
Verktøyikona er i standardversjonen grupperte. Verktøygruppene er merkte med eit lite, mørkt triangel nede i høgre hjørne av ikonet. Gruppeikonet som vert vist, er det som høyrer til verktøyet som er i bruk. Høgreklikk på gruppeikonet for å visa ei liste over verktøya i gruppa.
Du kan visa alle verktøya ved å fjerna avmerkinga for Bruk verktøygrupper i Del 6.13, «Verktøykassen».
Når peikaren er innføre eit bilete, endrar han form etter kva verktøy som er i bruk. Dette kan du endra i Peikarar i Innstillingar for inndataeiningar.
Figur 14.2. Fargeområde for forgrunn/bakgrunn i verktøykassa
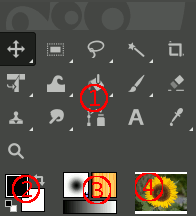
Område med forgrunnsfarge / bakgrunnsfarge (3)
Fargeområdet viser GIMP sin gjeldande forgrunns- og bakgrunnsfarge som vert brukt til teikning, fylling og mange andre operasjonar. Ved å klikka på eit av dei, får du opp eit dialogvindauge for fargeveljing slik at du kan endra fargen.
Klikkar du på det vesle symbolet nedst til venstre vert forgrunnsfargen og bakgrunnsfargen sett tilbake til svart og kvit. Du kan trykkja tasten D for å oppnå det same.
Klikkar du på pila med pilspissar i kvar ende, vil forgrunns- og bakgrunnsfargane bytta plass. Du kan trykkja tasten X for å oppnå det same.
![[Tips]](images/tip.png)
|
Tips |
|---|---|
|
Du kan klikke og dra ein av desse fargane direkte inn i eit lag og fylle heile laget med fargen. |
Figur 14.3. Gjeldande penslar, mønsterelement og fargeovergangar i verktøykassa
Gjeldande penslar, mønsterelement og fargeovergangar i verktøykassa er merkt med (4)
Som standard vert dette området ikkje vist. Du kan gjera det synleg i → → : Del 6.13, «Verktøykassen».
Her kan du sjå kva pensel, mønsterelement og fargeovergang som er i bruk. Klikk på kvar av dei for å få opp eit dialogvindauge der du kan gjere endringar i innstillingane.
Som standard vert dette området ikkje vist. Du kan gjera det synleg i → → : Del 6.13, «Verktøykassen».
Det vert vist ein miniatyr av det gjeldande biletet i dette området. Viss du klikkar på miniatyren, vert biletdialogvindauget opna. Dette kan vera nyttig viss du har mange bilete på skjermen.
Viss du brukar GIMP på eit Unix-liknande operativsystem med X Window System, kan du også dra og sleppa miniatyren til ein tilgjengeleg XDS filhandsamar for å lagra det tilsvarande biletet direkte.
Figur 14.5. Dialogvindauget for verktøyinnstillingane
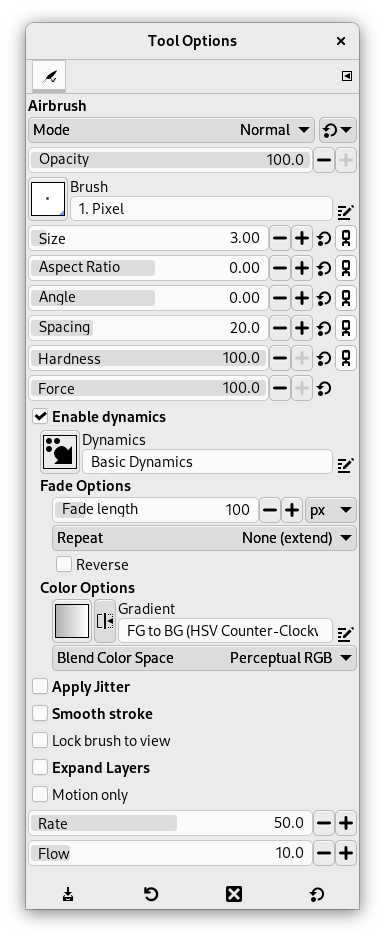
Dialogvindauget for innstillingane for luftpenselen.
Alle verktøya i GIMP har eit dialogvindauge der du kan bestemma ein del innstillingar for verktøyet. Dersom du ikkje har forandra normalinnstillingane for GIMP, vil dette innstillingsvindauget dukka opp når du klikkar på eit verktøysymbol. Har du fjerna dette dialogvindauget, bør du sterkt vurdera å setja det opp igjen. Det er vanskeleg å utnytta eit verktøy fullt ut utan å kunna tilpassa innstillingane.
|
|
Tips |
|---|---|
|
Dialogvindauget for verktøyinnstillingane ligg normalt like under verktøykassa. Dersom du fjernar dette dialogvindauget på ein eller annan måte, kan du få det tilbake ved å opprette det på nytt via menyen → → og lime det inn på plassen under verktøykassa. (Du finn meir om dette i Del 2.3, «Dialogvindauge og dokkpanel»). |
Kvart verktøy har sine eigne innstillingar som varer heilt til du endrar dei, uavhengig om du skifter til nytt bilete eller om du avsluttar GIMP og startar på nytt igjen. Dette kan av og til verke litt frustrerande, særleg dersom verktøyet oppfører seg merkeleg, og du har gløymt at du gjorde nokre uvanlege innstillingar nettopp på dette verktøyet for to veker sidan.
Nedst i vindauget for verktøyinnstillingane finn du fire knappar:
Med denne knappen kan du lagra innstillingane for det gjeldande verktøyet slik at du kan henta dei fram seinare. Knappen opnar Del 7.2, «Dialogvindauget for verktøyforvala» slik at du kan gje forvalet eit namn. Når du gjenopprettar innstillingane, vert berre dei forvala som er lagra for det gjeldande verktøyet viste. Difor treng du ikkje ta med verktøynamnet når du gjev innstillingane eit namn.
Med denne knappen kan du henta fram igjen dei tidlegare lagra innstillingane for det gjeldande verktøyet. Dersom det ikkje er lagra nokre innstillingar, vil denne knappen vera slått av. Dersom det derimot finst tidlegare lagra innstillingar, vil det dukka opp ei liste som du kan velje i.
Med denne knappen kan du sletta tidlegare lagra innstillingar. Dersom det ikkje er lagra nokre innstillingar, vil denne knappen vera slått av. Dersom det derimot finst tidlegare lagra innstillingar, vil det dukka opp ei liste som du kan velja i.
Denne knappen tilbakestiller alternativa for det gjeldande verktøyet til standardverdiane. Viss du held nede Shift-tasten medan du trykkjer på Tilbakestill-knappen, vert alternativa for alle verktøya tilbakestilte til standardverdiane.
I tillegg til kommandoane for knappane ovanfor, har fana for verktøyinnstillingar ein ekstra undermeny:
Denne undermenyen viser ei liste over alle forvala for det gjeldande verktøyet. Denne lista kan du redigera. Vel du eitt av forvala, vert Rediger verktøyforvala opna med forvala for det gjeldande verktøya. Du kan redigera forvala dine her, men ikkje dei som kjem saman med GIMP.
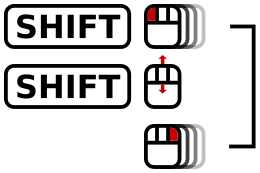
Nedanfor vil me forklara samhandlinga mellom glidebrytarane og musehjulet.
Du kan bruka fleire modifikatorar med anten venstreklikk eller musehjulsrulling:
Tabell 14.1. Samhandling med skjermelementet glidebrytar
|
Kombinasjonen datamus/taster |
Handling |
|---|---|
 |
Endra verdien til det han er under peikaren |
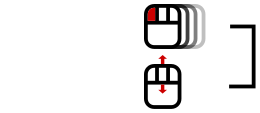 |
Endra verdien ved å bruka standard auke |
 Shift + eller |
Endra verdien ved å bruka mindre auke |
 Ctrl + |
Endra verdien ved å bruka større auke |
 |
Gå inn i numerisk inntastingsmodus, ikkje merk verdien |
 |
Gå inn i numerisk inntastingsmodus, merk verdien |
| Hint: Alle venstreklikk gjer numerisk inntastingsmodus tilgjengeleg. | |
Du kan altså grovjustere innstillinga på den øvre delen og deretter finjustere på den nedre delen av brytaren.
Verdiområdet i glidebrytaren fungerer som ein tekstredigerar: der kan du redigera verdien eller skriva inn ein ny verdi direkte.
I nokre tilfelle kan du faktisk dra peikaren utføre verktøydialogvindauget. Såleis kan du dra glidebrytaren for storleik, som har ein maksverdi på 10.000, tvers over heile skjermen.
Når du brukar verktøy, kan du bruka rullehjulet på datamusa i kombinasjon med ulike modifikatorar for å gjera nyttige ting med verktøyalternativa til det valde verktøyet:
Alt + musehjul: auk/minsk dekkevne
Shift+primær + musehjul: auk/minsk sideforholdet
Shift+Alt + musehjulet: auk/minsk vinkel
Primær+Alt + musehjulet: auk/minsk storleik
Shift+Primær+Alt + musehjul: auk/minsk mellomrom
Merk at Primær-modifikatoren til vanleg er Ctrl eller Cmd, avhengig av kva plattform som er i bruk.

